Introduction
Note: The original article was published on my company’s blog https://blog.sec-it.fr/.
Steganography is the process of hiding a confidential message within data. As part of a course taught at ESNA, I proposed a series of steganographic exercises and challenges, whose solutions are given here. The challenges are sorted by increasing difficulty.
Challenges
PDF is a challenge providing a PDF file. It is a copy of ESNA’s presentation PDF, and has a total of 2 pages.
In steganography, PDF files are known for their differing interpretations depending on the reader, but also for the overlapping of PDF objects which sometimes makes certain objects such as text blocks or images invisible. These same PDF objects can sometimes be listed in the file’s cross-reference table but not displayed in the document.
For this challenge, it was simply black text on a black background:
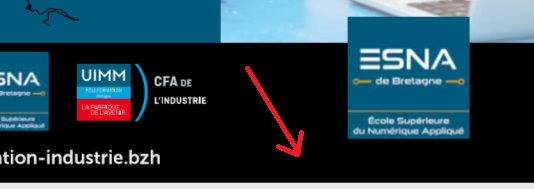
Few PDF readers allow selecting hidden text like this; the reader built into Google Chrome does, however, let you select all the text (CTRL+A). You then simply copy and paste the content into a text file.
We thus end up with the character string 92149279564403446967073413054727415165.
It is an integer encoded in base 10.
To convert this integer into a character string, you can convert it to binary or hexadecimal and then to text, or use the following python3 command:
import binascii
a = f"{92149279564403446967073413054727415165:0>4X}"  # convertion en hexa
binascii.unhexlify(a)  # ici a = "45534E417B737041414141414163657D"
# b'ESNA{spAAAAAAce}'
Another solution in ruby:
require 'ctf_party' # gem install ctf-party
'92149279564403446967073413054727415165'.dec2hex.hex2str # => 'ESNA{spAAAAAAce}'
Flag: ESNA{spAAAAAAce}
Music please
For this challenge, a challenge.wav file was provided.
The wav file is 31 seconds long and features the beginning of the track IMANU - Memento.
The keenest ears will recognize a faint crackling present only during the first 4 seconds of the file.
This rather high-pitched crackling should be visible in the high frequencies of the wav file’s audio spectrum.
To observe it, simply open the file with the audacity tool.
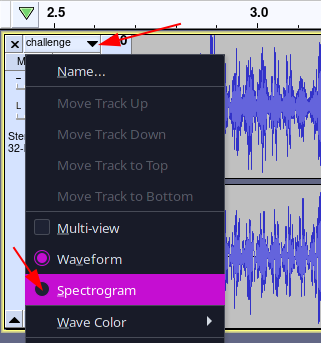
Once the spectrum is displayed, it is generally shown on a limited scale not exceeding 8000 Hz.
To display the full spectrum (and therefore the high frequencies), right-click on the frequency scale and choose Zoom to Fit (or Zoom Adapté in the French version).
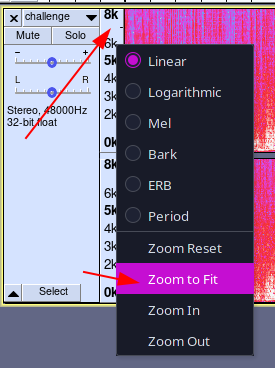
The spectrum is now fully displayed.
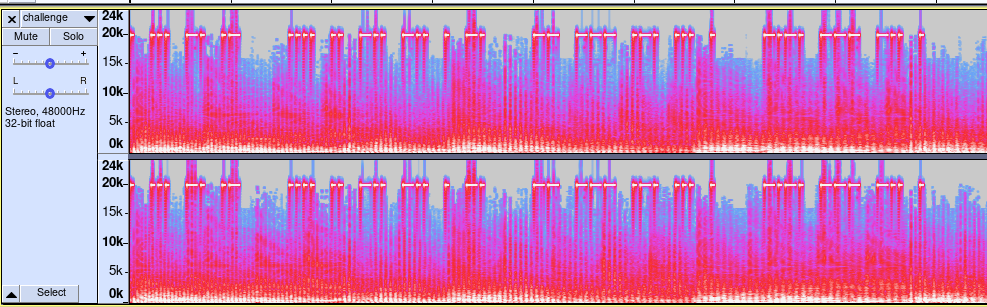
We can see a signal transmitted in the high frequencies using short and long pulses. It is in fact international Morse code, which allows text to be transmitted using series of short and long pulses. This same code allowed prisoner of war Jeremiah Denton to transmit the word torture during a televised interview using a series of eye blinks. This hidden message notably made it possible to bypass Vietnamese censorship and confirm for the first time the use of torture on American prisoners.
. ... -. .-
.... .. -.. -.. . -.
-- --- .-. ... .
-.-. --- -.. .
Once decoded, the Morse code becomes:
ESNA HIDDEN MORSE CODEFLAG: ESNA{HIDDEN MORSE CODE}
Music please - Flag 2
Still within the same challenge.wav file was a second hidden message.
The music contained in the file seems to be cut off just before the drop of the original composition (as indicated by its total duration of 31 seconds when opened in a standard player).
The file size also seems abnormally high (a little over 90 megabytes), which generally corresponds to a high-quality file several minutes long.
The file could therefore have been deliberately altered to limit its playback.
In order to repair the wav file, we first need to look into its file format:
[Bloc de déclaration d'un fichier au format WAVE]
   FileTypeBlocID  (4 octets) : Constante « RIFF »  (0x52,0x49,0x46,0x46)
   FileSize        (4 octets) : Taille du fichier moins 8 octets
   FileFormatID    (4 octets) : Format = « WAVE »  (0x57,0x41,0x56,0x45)

[Bloc décrivant le format audio]
   FormatBlocID    (4 octets) : Identifiant « fmt␣ »  (0x66,0x6D, 0x74,0x20)
   BlocSize        (4 octets) : Nombre d'octets du bloc - 16  (0x10)

   AudioFormat     (2 octets) : Format du stockage dans le fichier (1: PCM entier, 3: PCM flottant, 65534: WAVE_FORMAT_EXTENSIBLE)
   NbrCanaux       (2 octets) : Nombre de canaux (de 1 à 6, cf. ci-dessous)
   Frequence       (4 octets) : Fréquence d'échantillonnage (en hertz) [Valeurs standardisées : 11 025, 22 050, 44 100 et éventuellement 48 000 et 96 000]
   BytePerSec      (4 octets) : Nombre d'octets à lire par seconde (c.-à-d., Frequence * BytePerBloc).
   BytePerBloc     (2 octets) : Nombre d'octets par bloc d'échantillonnage (c.-à-d., tous canaux confondus : NbrCanaux * BitsPerSample/8).
   BitsPerSample   (2 octets) : Nombre de bits utilisés pour le codage de chaque échantillon (8, 16, 24)

[Bloc des données]
   DataBlocID      (4 octets) : Constante « data »  (0x64,0x61,0x74,0x61)
   DataSize        (4 octets) : Nombre d'octets des données (c.-à-d. "Data[]", c.-à-d. taille_du_fichier - taille_de_l'entête  (qui fait 44 octets normalement).
   DATAS[] : [Octets du  Sample 1 du Canal 1] [Octets du Sample 1 du Canal 2] [Octets du Sample 2 du Canal 1] [Octets du Sample 2 du Canal 2]

   * Les Canaux :
      1 pour mono,
      2 pour stéréo
      3 pour gauche, droit et centre
      4 pour face gauche, face droit, arrière gauche, arrière droit
      5 pour gauche, centre, droit, surround (ambiant)
      6 pour centre gauche, gauche, centre, centre droit, droit, surround (ambiant)

NOTES IMPORTANTES :  Les octets des mots sont stockés sous la forme Petit-boutiste (c.-à-d., en "little endian")
[87654321][16..9][24..17] [8..1][16..9][24..17] [...
Among all the blocks describing the file, the DataSize block catches our attention.
Indeed, it specifies the number of audio data blocks in the file.
If it has been deliberately decremented, then part of the file will not be played by players.
The DataSize block is easily identifiable since it is the 4 bytes following the data constant.
We can now edit our wav file in a hex editor such as hexedit or the online hex editor HexEd.it.
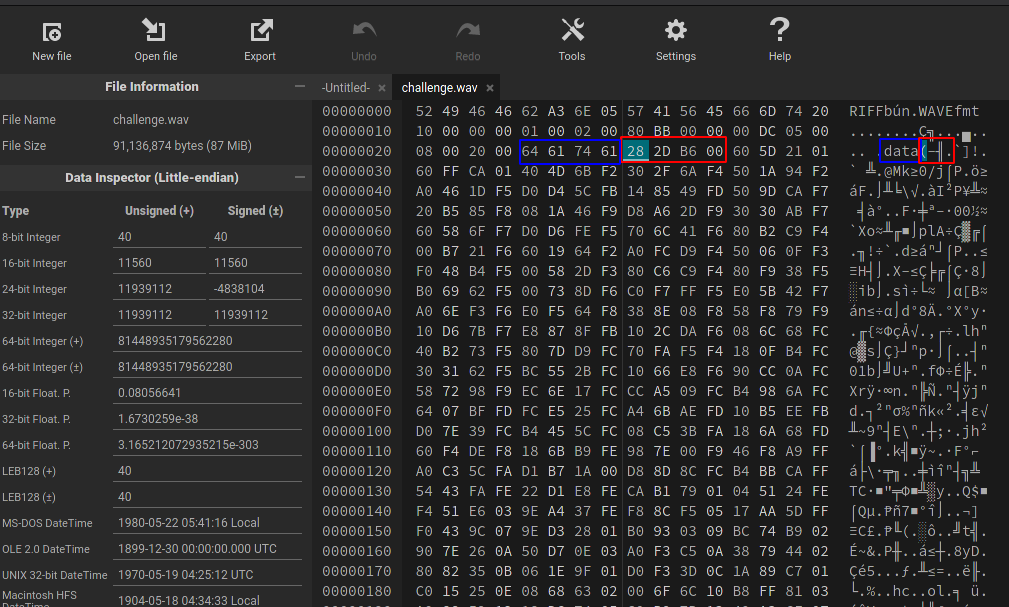
The content of the DataSize block is thus 28 2D B6 00.
We can see that the size is encoded in little-endian order, with the most significant bytes toward the end.
We therefore have 0x00B62D28 blocks (11939112).
We are going to increase this value to 0xFFB62D28 blocks (4290129192), i.e. the value 28 2D B6 FF.
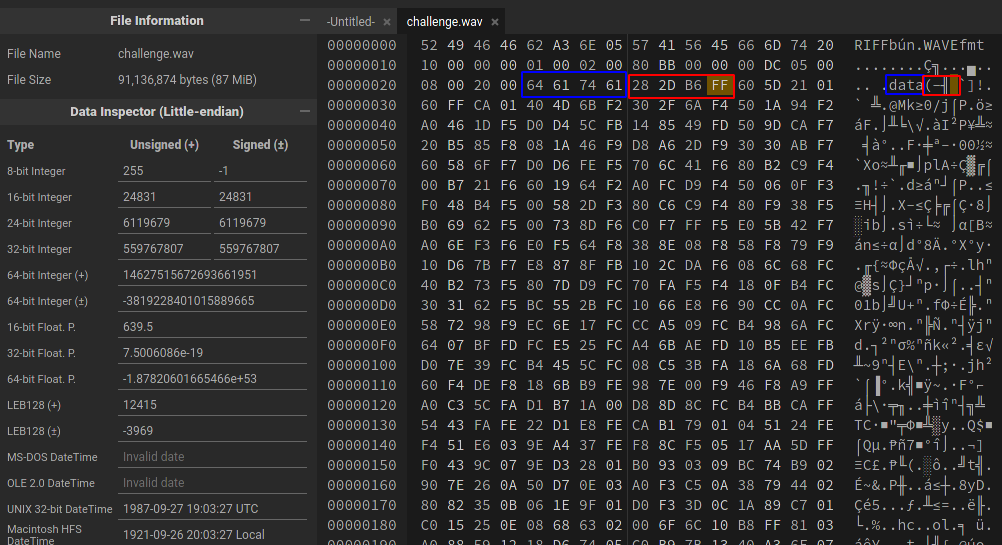
You then simply save the file and open it again. We now see that the file has a duration of 3:57.

The end of the music finishes with a voice giving the following message:
Bravo, the flag is in uppercase : ESNA{IMANU_MEMENTO}.
I hope you enjoyed it. If you misspelled the flag, you can verify with the music name.
Flag: ESNA{IMANU_MEMENTO}
Stats - MSE
For this challenge, a cover_image.png and a stego_image.png file were provided, with the following prompt:
Calculer la valeur MSE pour le couple d'image suivant, tronqué 10 chiffres après la virgule.
Format de flag ESNA{XX.XXXXXXXXXX}.
Having followed the course, or with a quick search engine query, you come across the Wikipedia page for the Mean squared error (“Erreur quadratique moyenne” in French). This metric is generally associated with the PSNR, covered in the next challenge.
The mean squared error is a statistical estimator which, in image processing, is used to compute the average difference between the pixels of two images. It is defined by the following formula:

To compute this value, we use python and the Pillow library.
#!/usr/bin/env python3

# pip3 install Pillow

from PIL import Image

img1 = Image.open("cover_image.png")
img2 = Image.open("stego_image.png")

I = list(img1.getdata())
K = list(img2.getdata())

# MSE
s = []
for p in range(len(I)):  # p remplace le couple (i,j)
    s.append((I[p]-K[p])**2)  # (I(i,j) - K(i,j))²
mse = sum(s) / len(s)  # somme * 1/(m*n)

print(f"MSE: {mse}")
The output is: MSE: 0.49977941176470586.
Flag: ESNA{0.4997794117}
Stats - PSNR
The prompt for this challenge reused the same two images as the previous challenge, this time asking for the PSNR value of the two images. The PSNR (Peak signal-to-noise ratio) is a measure of distortion that is computed directly from the mean squared error (i.e. the MSE value computed in the previous challenge). The PSNR is defined as follows:
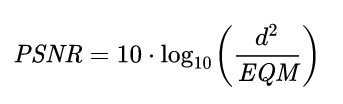
To solve the challenge, we simply reuse our script and add the computation of the formula.
Note the import of the log10 function from the native math library:
#!/usr/bin/env python3

# pip3 install Pillow

from PIL import Image
from math import log10

img1 = Image.open("cover_image.png")
img2 = Image.open("stego_image.png")

I = list(img1.getdata())
K = list(img2.getdata())

# MSE
s = []
for p in range(len(I)):  # p remplace le couple (i,j)
    s.append((I[p]-K[p])**2)  # (I(i,j) - K(i,j))²
mse = sum(s) / len(s)  # somme * 1/(m*n)

# PSNR
psnr = 10*log10((255**2)/mse)

print(f"PSNR: {psnr}")
The output is: PSNR: 51.14301999315866.
Flag: ESNA{51.1430199931}
Purple
The challenge provides a challenge.bmp file. The exiftool command gives us more information about the file format:
$ exiftool challenge.bmp
ExifTool Version Number         : 12.14
File Name                       : challenge.bmp
Directory                       : .
File Size                       : 5.3 MiB
File Modification Date/Time     : 2021:03:22 12:18:13+01:00
File Access Date/Time           : 2021:03:22 12:18:27+01:00
File Inode Change Date/Time     : 2021:03:22 12:18:26+01:00
File Permissions                : rw-r--r--
File Type                       : BMP
File Type Extension             : bmp
MIME Type                       : image/bmp
BMP Version                     : Windows V5
Image Width                     : 1440
Image Height                    : 960
Planes                          : 1
Bit Depth                       : 32
Compression                     : Bitfields
Image Length                    : 5529600
Pixels Per Meter X              : 3780
Pixels Per Meter Y              : 3780
Num Colors                      : Use BitDepth
Num Important Colors            : All
Red Mask                        : 0xf8000000
Green Mask                      : 0x07e00000
Blue Mask                       : 0x001f0000
Alpha Mask                      : 0x00000000
Color Space                     : sRGB
Rendering Intent                : Proof (LCS_GM_GRAPHICS)
Image Size                      : 1440x960
Megapixels                      : 1.4
We therefore have a bitmap image with the following masks:
- Red Mask : 0xf8000000
- Green Mask : 0x07e00000
- Blue Mask : 0x001f0000
By searching for these addresses on the internet, we realize that the image is saved using RGB565 mode (also called R5G6B5).
These numbers correspond to the number of bits allocated per channel (i.e. a total of 16 bits).
An internet search for R5G6B5 BMP steganography leads us to the article “BMP PCM polyglot”.
Note: the site could also be found with the search “BMP 16 bits polyglot”.
The article then explains that it is possible to create a file that is both a valid BMP image and also a sound in raw format (PCM). To do this, the two source files must be encoded on 16 bits (both the wav file and the bitmap file) in order to generate a BMP encoded on 32 bits. The article explains that combining the files extends the audio spectrum and places the pixel content in the inaudible spectrum. The R5G6B5 mask definition then indicates the position of the image data within the file.
To read the image, the article suggests using aplay or audacity.
For the latter, you simply launch the tool and click Fichier > Importer > Données brutes (Raw)... and select the image.
Then specify an encoding of Signed 32 bits PCM, a Petit boutiste byte order, Stereo channels with a sampling rate of 44100 Hz:
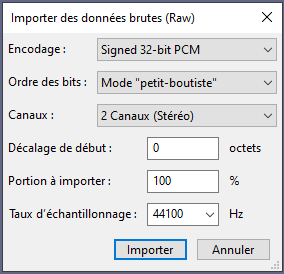
Once our file is loaded in audacity, you can hear a sped-up human voice.
To slow it down, select the audio (CTRL+A) then click Effets > “Ralentir” and apply a ratio of 0.250.
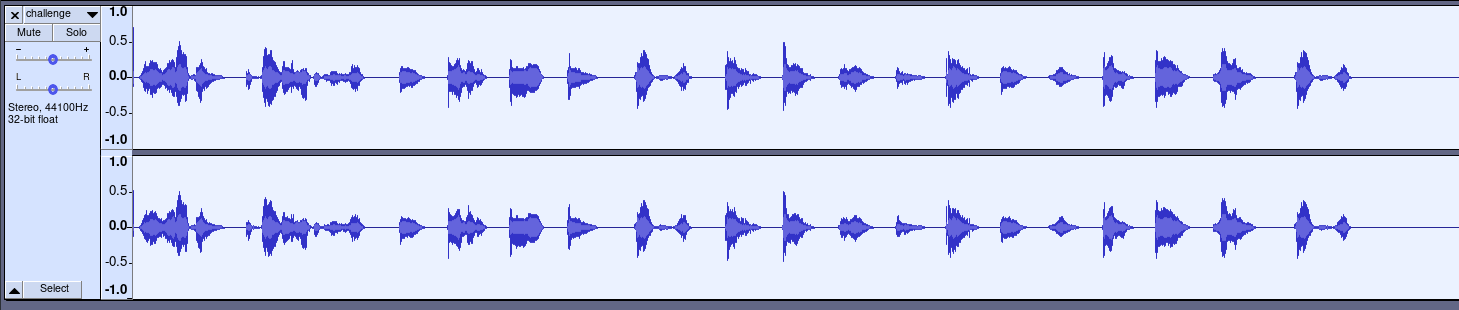
By clicking the play button, you hear the following message:
GG well play, the flag is in uppercase :
ESNA{LITTLEPOLY}
Flag: ESNA{LITTLEPOLY}
LSB Factory
This challenge provides a website with an upload form and a timer of a few seconds. The website in question asks us to encode a given message into an image using the LSB technique:
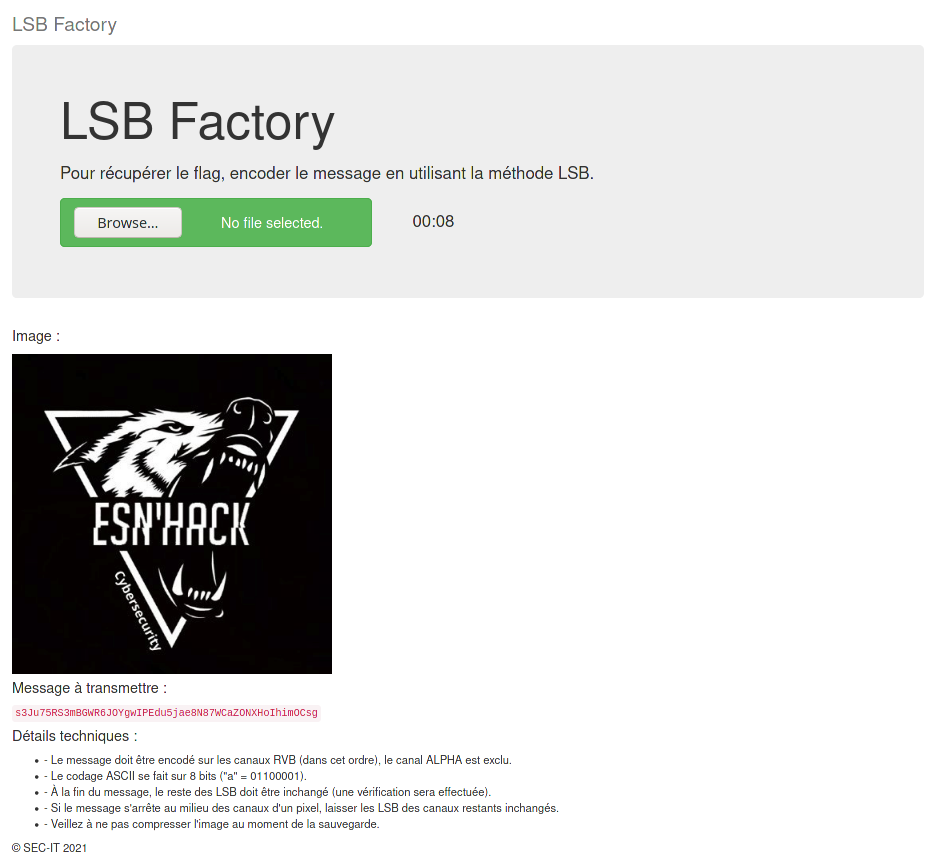
Since the LSB technique was covered during the course preceding the lab, we invite the reader to look into this method to understand the rest of the solution. To solve this challenge, we are going to develop a python script using the requests library for the web requests and pillow for handling the image. A starter script was also provided as a hint, where only the LSB manipulation was required (only lines 33 to 50 were missing). Here is the final script:
#!/usr/bin/env python3

# pip3 install requests
# pip3 install Pillow

import base64
import io
import requests
from PIL import Image

HOST = "http://51.75.16.174:8000/"

# On créé une session de navigateur
s = requests.session()

# On requète l'index pour avoir le challenge
r = s.get(HOST).text

message = r.split("<code>")[1].split("</code>")[0]  # Message attendu

base64_image = r.split('<img src="')[1].split('"/>')[0].replace("data:image/png;base64,","")
cover_image = Image.open(io.BytesIO(base64.b64decode(base64_image)))  # Image

cover_image.save("cover_image.png")  # On enregistre une copie local du fichier
pxs = list(cover_image.getdata())  # On récupèré la liste de pixels [(255,255,255), (255,255,255), ...]
w,h = cover_image.size  # On récupère la taille de l'image

print(f"Taille de l'image : {w}x{h}")
print(f"Message : {message}")

# TODO : Modifier la liste de pixels avec les bons LSB

# On converti le message en binaire
message_bin = ''.join([bin(ord(x))[2:].zfill(8) for x in message])

# On génère la nouvelle image
newpxs = []
x = 0
for i in range(h*w):
    r,g,b = pxs[i]
    if x < len(message_bin):
        r = r - r%2 + int(message_bin[x])
        x +=1
    if x < len(message_bin):
        g = g - g%2 + int(message_bin[x])
        x +=1
    if x < len(message_bin):
        b = b - b%2 + int(message_bin[x])
        x +=1
    newpxs.append((r,g,b))

stego_image = Image.new(cover_image.mode,cover_image.size)
stego_image.putdata(newpxs)
stego_image.save("stego_image.png")  # On enregistre une copie local du fichier

# On envoi la nouvelle image sur le serveur
r = s.post(HOST+"/upload", files={'image': open('stego_image.png','rb')}).text
print(r)  # On affiche la réponse du serveur web
In more detail:
- Line 17: First web request to generate the secret message and the cover image
- Line 19: Retrieving the secret message into a variable
- Line 21-22: Retrieving the image as a PIL.Image
- Line 25: Converting the image into a list of pixels
- Line 34: Converting the secret message to binary
- Line 39-50: Iterating over the pixels and modifying the new list of pixels according to the secret message
- Line 39: Loop over all the pixels
- Line 40: Retrieving the current pixel and its R, G, B channels
- Line 42, 45, 46: We modify the channel values by removing the LSBs and adding the LSB coming from the secret message
- Line 52-54: Generating the new image from the list of pixels
- Line 57: Sending the new image and retrieving the response
- Line 58: Displaying the response
Once launched, the script returns the flag:
Taille de l'image : 400x400
Message : NhTK372hg6q9AJShcayXxosQhXEOwOERyH3rfJVM60Z29MfvvG
ESNA{I_made_4n_anoying_LSB_Steg0_ch4ll}
Flag: ESNA{I_made_4n_anoying_LSB_Steg0_ch4ll}
Linked List LSB
This challenge was the hardest of the whole lab. To solve it, a scientific paper is provided along with a PNG image. The scientific paper presents a steganographic model based on the LSB method as well as on a distribution of pixels following a linked-list principle.
In this method, a link (or block) is represented by a sequence of successive pixels. The data stored by the block (the secret value) is encoded in the LSBs of the first 3 pixels. The address of the next link (and therefore the number of the next pixel) is, for its part, stored in the block’s remaining LSBs.
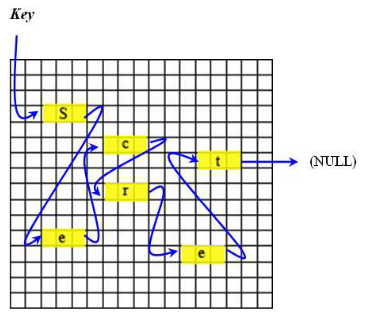
With this technique, the size of a block depends on the size needed to store the address of the next block, and therefore indirectly depends on the size of the image. The larger the image, the more pixels it has, the more bits a pixel’s address needs to be stored, and the larger a block will be.
More precisely, the size needed to store an address is defined as follows:
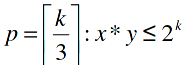
- x*y the number of pixels
- k the number of bits needed to store an address
- k/3 the number of pixels needed to store an address
The first step was therefore to compute the size of an address and of a block for the given image.
Our image has a size of 3840x2160, i.e. a total of 8294400 pixels. We therefore need 2^23 bits to store that many addresses (here, k = 23).
By distributing this total of 23 bits over the LSB layers, we obtain 7 full pixels plus 2 channels, i.e. 8 pixels in total.
The size of an address is therefore 8 pixels. The block size is thus 3 data pixels + 8 addressing pixels, i.e. a total of 11 pixels per block.
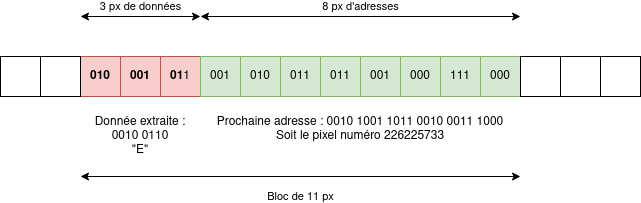
Once the size of a block is computed, we need to code an extraction function to retrieve both the value of the secret hidden in the link and the address of the next link.
For our script, this function therefore takes as input the address of a link in the data pixel list, appends the block’s secret to the secret_msg variable, and returns the address of the next block:
def get_data(addr):
    """ Extract byte and return next address addr. """
    global secret_msg
    s = ""
    # First, get data on 3 first pixels
    for i in range(8):
        c = data[addr+i//3][i%3]
        s += str(c%2)
    secret_msg += chr(int(s, 2))

    # Then we return next address
    r = ""
    for i in range(nb_px_addr*3):
        c = data[addr+3+i//3][i%3]
        r += str(c%2)
    return int(r, 2)
Since the challenge prompt gives us the address of the first block (Starting pixel: 6075891), a manual check of the function’s results on this first block lets us verify that the function works correctly.
We do indeed retrieve the letter E and the address of the next link: 2732600.
The final extraction script is the result of the get_data function and a loop, all preceded by the automatic computation of the link size:
#!/usr/bin/env python3

# pip3 install Pillow

from PIL import Image
import math

stego_image = Image.open("stego_image.png")

addr = 6075891  # start addr


# First, compute nb of pixels needed for address embeding

w,h = stego_image.size
i, n = 0, 0

while i < (w*h):
    n += 1
    i = 2**n

nb_px_addr = math.ceil(n/3)
block_size = 3+nb_px_addr

print(f"Pixels needed to embed an address: {nb_px_addr}")
print(f"Pixels per char : {block_size}")


# Decode data

secret_msg = ""
data = list(stego_image.getdata())  # Image data list
size = w*h


def get_data(addr):
    """ Extract byte and return next address addr. """
    global secret_msg
    s = ""
    # First, get data on 3 first pixels
    for i in range(8):
        c = data[addr+i//3][i%3]
        s += str(c%2)
    secret_msg += chr(int(s, 2))

    # Then we return next address
    r = ""
    for i in range(nb_px_addr*3):
        c = data[addr+3+i//3][i%3]
        r += str(c%2)
    return int(r, 2)

while True:
    addr = get_data(addr)
    print(secret_msg)
Running the script returns the flag:
Flag: ESNA{L1nk3d_List_LSB_technique} - https://www.sec-it.fr/ - [end]
About
The original article was published on my company’s blog https://blog.sec-it.fr/.
You can find SEC-IT at https://www.sec-it.fr.
Part of this content is under the MIT license / © 2021 SEC-IT.